Add Layer
Clicking on Add will open the window below (Figure 1). Depending on your data format, you can upload a Table, a Raster or a Shapefile. You then need to select a Category (choose that is closest to your type of data, this is only required to store the layer). You can optionally provide a Description of your dataset. Finally select your file and click Upload.
Contents
Table
Make sure that your table meets the following standards:
Format: Only a semicolon delimited file ('*.csv') is valid.
Headers: the first line of the table is considered as headers, which have to be denoted correctly as described below.
Required Columns: 3 columns (Index, Latitude and Longitude) are required.
- acceptable index column name: Index
- acceptable latitude column name: Latitude, Lat, Y, North, Northing
- acceptable longitude column name: Longitude, Lon, X, East, Easting
Make sure that the first data line (i.e. the second line of your table) is filled with numerical values and not left empty even if no measurement exists. Otherwise the whole column will be treated as a string and can not be used as numerical data.
Example Table (VAR1 and VAR2 are arbitrary variable)
| Index | Lat | Lon | VAR1 | VAR2 |
|---|---|---|---|---|
| 1 | 28.4 | 87.6 | 1 | 2 |
| 2 | 27.9 | 87.5 | 2 | 0 |
Coverage
Format: Only one band *.tif format is valid.
Shapefile
 Format: Only compressed zip file is valid.
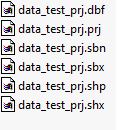
 Contents: The zip file must contain *.dpf, *.prj, *.sbn, *.shp, *.shx, *.sbx files.
 NOTE: Make sure files are directy in the zip folder.
Example:
Valid projection
Geographic Coordinate System: GCS_WGS_1984 Datum: D_WGS_1984 Prime Meridian: Greenwich Angular Unit: Degree EPSG:4326
For more information check WGS84
